Chatbot Logic on Custom Data from Website
The easiest way to create a chatbot based on your custom data from a website.


By now you guys would know that I am on a journey of developing a chatbot that will be able to answer any questions regarding my University. Previously, I outlined what my plan is, which Large Language Model (LLM) I am going to use, along with how I am going to fetch and store the data. I am now happy to say that I have completed the functionality for the logic of the chatbot.
In this blog, I will outline the steps I took to do this and how you can also achieve the same using data from a website. This code will use OpenAI's API and Pinecone's vector store to store the vector embeddings.
Imports
You might have guessed it. The first stage, before you start any actual coding is to import all the packages and libraries.
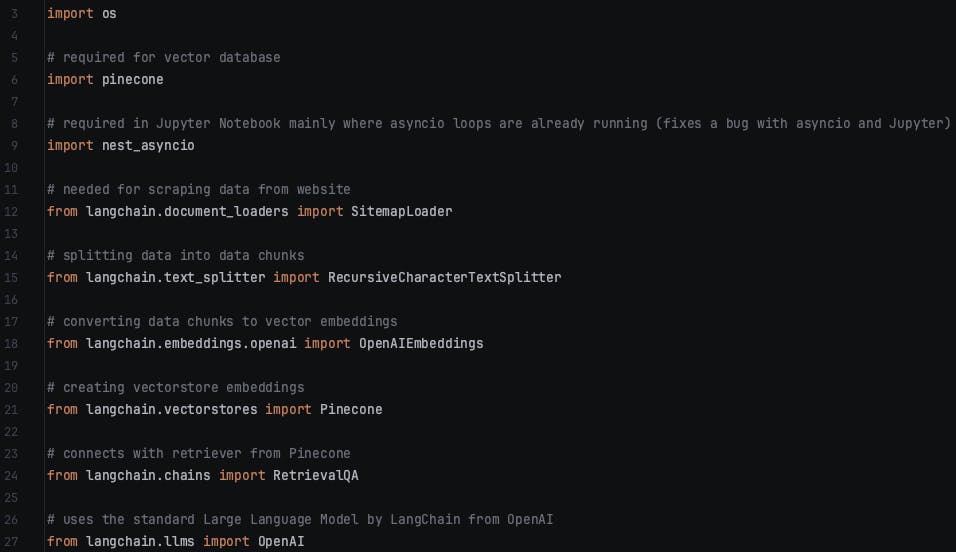
Above is the image for all the imports required. I have also included a small comment (apart from import OS) for each import explaining why we need it but don't worry about this now... it will make more sense later when you start coding.
APIs & Pinecone Environment
The next stage is to set up the OpenAI API and Pinecone environment. For this stage, you would need to create an OpenAI account and transfer some money to your account to get started.
Then, go to Pinecone and create an account there. Pinecone has different options but for a normal website, the starter index should be fine which is free. After creating an account, create an API key and an index. It is important to ensure that when creating an index in Pinecone, set the dimensions to 1536 with cosine as the metrics.
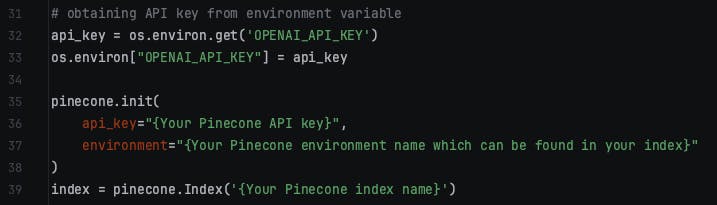
Note: it is very useful to set your OpenAI API key as a system variable so you don't need to type out the unique identifier token. This is useful when you want to push your code to GitHub for example, then others will not be able to see your API key.
Set OpenAI API Key as System Variable
If you don't have a paid account or are lacking funds in your OpenAI account, you may see the error message below:

This means that you have made too many requests to the API in a short period of time. To find more information about Rate Limits in OpenAI, you can refer to the documentation which can be found here:
SiteMapLoader
Now we can begin coding!
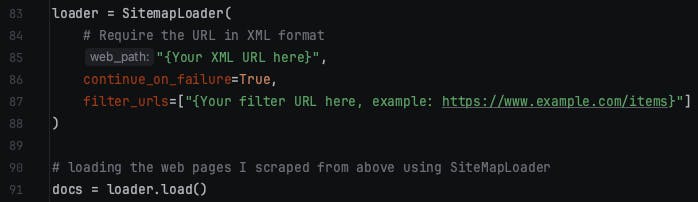
SiteMapLoader is the Document Loader we will be using. Here, we essentially provide it with a website's XML. It will scrape and load all the pages in the sitemap concurrently returning each page as a document. More information about SiteMapLoader can be found in the LangChain documentation:
SiteMapLoader LangChain Documentation
What is an XML SiteMap?
An XML stores all the URLs for a website. It can also contain extra information such as metadata, which may be useful for increasing the relevancy of search results.
How to get the XML of a Website?
Say for example your URL is:
To get the XML of this, the general rule is to append it with:
sitemap.XML
so in the URL field type:
This should provide you with the sitemap of all the URLs available on the website.
continue_on_failure
It is important to note that if your XML sitemap contains other links with different extensions such as .pdf, then you can add an additional parameter as I have done above which is:
continue_on_failure = True
Normally, whilst siteMapLoader scrapes the URLs, if it comes across something which it does not recognise, then it throws an error and stops running. However, by setting this parameter to True, it would provide a message saying it is not able to scrape this page... and then continue to scrape the remaining URLs.
It is set to False by default so it may be beneficial to you to change it to True.
More information about this can be found here: Continue on Failure SiteMapLoader
Filter URLs
We can also add the parameter: filter_urls
This will only scrape the webpages from the XML provided which starts with the filter passed. This means if you don't require all URLs from the Sitemap, then you can just capture what you need.
More information about this can be found here: Filter URLs on SiteMapLoader
nest_asyncio.apply()
Note: it is also useful to include:
# introduces asynchronous processing to handle tasks concurrently
nest_asyncio.apply()
This introduced asynchronous programming which means we are nesting a new event loop within our existing environment which can help to resolve issues related to event loop conflict.
Fetching Webpages
The SiteMapLoader fetches the webpages from the sitemap provided.
When running the code, it would produce an output such as the image below.
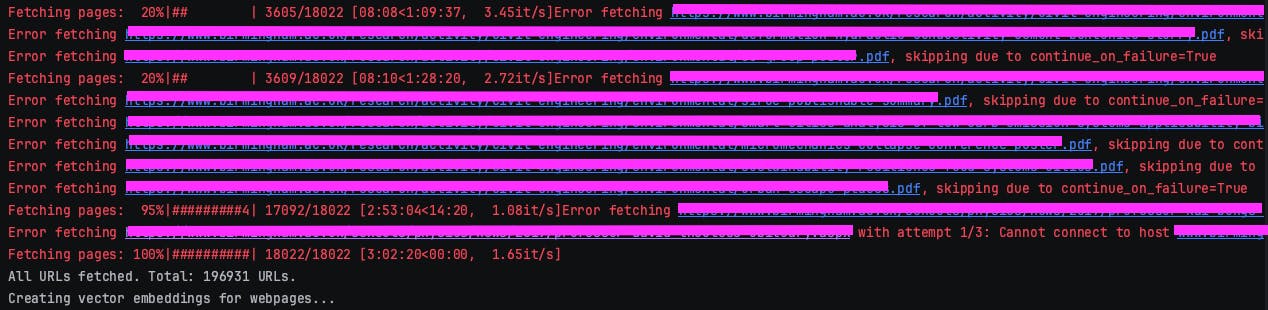
I am also printing the total number of URLs which have been fetched from the Sitemap I provided.
Note that I also have .pdf files in the sitemap I provided but SiteMapLoader does not deal with .pdf files. Therefore, it returns a message Error fetching {url} skipping due to continue_on_failure=True.
If you want a separate explanation on how to create a chatbot using your own PDFs or from PDFs which are available online, then please do let me know.
Explanation of SiteMapLoader
Now we have used SiteMapLoader but you might be wondering what exactly is and how it works.
Essentially, at this point, we have 1 very large document which has way too many characters (of course the actual size of your document will depend on how many URLs were in your XML Sitemap).
This large document is way too big and will not fit in a prompt so we need to break it down into many smaller documents.
The way we do this is by using RecursiveCharacterTextSplitter. This splits the text from 1 large document into smaller chunks which will fit in the prompt when passed to OpenAI.
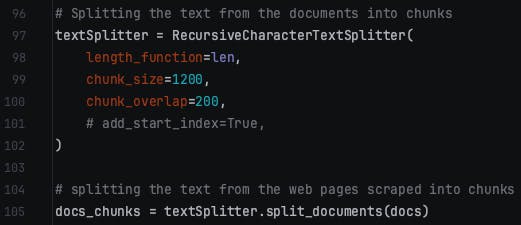
Here, we are using RecurisveChaarcterTextSplitter and setting its parameters. You can play around with the chunk_size and chunk_overlap values as different values may work better for your use case.
More information about RecursiveCharacterTextSplitter can be found here:
RecursiveCharacterTextSplitter LangChain Documentation
Embeddings and Vector Store
# Creating embeddings
embeddings = OpenAIEmbeddings()

# creating vectorstore embeddings
index_name = "{Name of your index in Pinecone}"
We are using OpenAI to generate the vector embeddings which are then being stored in the index you have created in Pinecone.
We will then run the line:
# generating vector embeddings in Pinecone for webpages scraped
web_docsearch = Pinecone.from_documents(docs_chunks, embeddings, index_name=index_name)
This line above will generate the vector embeddings and store them all in the index you created in Pinecone. Depending on the number of vector embeddings generated, this process could take a long time.
It is important to note that this line has to be only run once on the first time. You do not need to generate the vector embeddings on each run so after having run it once, you can then use the line below to query it from an existing vector store:
# already have index then can simply load it shown below ↓ (don't need to run web scraping or pdf fetching
web_docsearch = Pinecone.from_existing_index(index_name, embeddings)  # for webpages scraped and pdfs fetched
This line above uses an existing index to query from rather than generating all the vector embeddings from scratch.
Large Language Model
Next, we need to specify which LLM we want to use. A LLM is simply a model which has been trained on large amounts of text data so that it can understand humans.
# using LangChain default LLM model provided by OpenAI
llm = OpenAI()

web_qa_with_sources = RetrievalQA.from_chain_type(llm=llm, chain_type="stuff", retriever=web_docsearch.as_retriever(), return_source_documents=True)
By not specifying the parameter in OpenAI(), it takes GPT-3.5 Turbo as default although you can specify a specific model if you require one (like GPT4).
The second line essentially enables your chatbot to provide accurate and high-contexted responses to user queries by retrieving information from the indexed documents from Pinecone.
Note: We set return_source_documents=True which means it will also return the URLs it fetched the information for when answering the user's query.
More information about the specific QA chain can be found here:
RetrievalQA Chain LangChain Documentation
User Query
This is the final section of coding before our chatbot is fully ready.
Here, we need to define a variable {query} where the user can input their question into the prompt. The chatbot will take this input, convert it into a vector, and then query the Pinecone index for a vector that is similar/same and return this as an output.
The code is as follows:
query = "Ask Question Here!"

result = web_qa_with_sources({"query": query})
print(result["result"])
print(result["source_documents"])
query: variable takes in the prompt from the user.
result: this generates the output from the query asked
The first print statement prints a response to the console which will answer the user's question. The second print statement will show where it found the information to answer the query and provide the URL so the user can directly go to the webpage if they have further questions.
Conclusion
Whether you are new to the rapidly advancing field of AI or you are an expert, I hope you found this useful. Congratulations on building your chatbot and I hope you learnt something.
If anything does not make sense or you would like further clarification on something or you just want to discuss something else please do not hesitate to reach out to me.
Thank you for your time.